
Spooky season is upon us! Halloween seems to just get bigger and bigger, with pumpkin patches popping up everywhere and seasonally spiced treats at every corner. Halloween doesn’t seem to have the pressure and expectations around it that Christmas does so it's the perfect time to have fun with some making. Your little monsters will love these makes to scare up your abode!

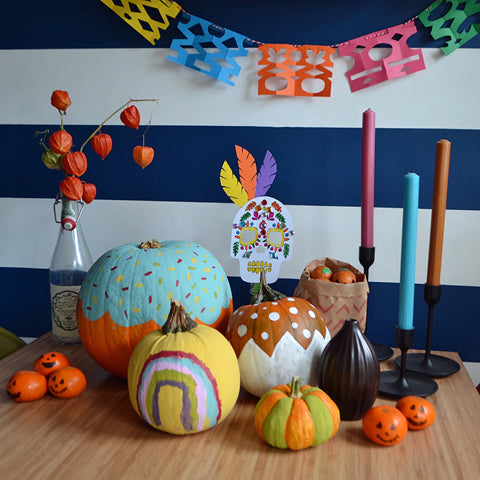
Painting pumpkins is just the most satisfying way to decorate the vibrant veg, no worries with carving for tiny hands and a great way to use of old sample pots of paints. Chalk based paints work best, but any will do, just make sure your pumpkin is at room temperature and clean and dry before you start.

Step 1
Paint the pumpkin with a base layer - you could paint half as I did with the blue pumpkin, use stripes or checks, or use a wavy line - have fun! It’s really nice to do the whole thing as a family and each have one to decorate. We do this as a tradition each year and it's so lovely to see the change in the children’s artistic skills!
Step 2
Layer on the decoration, you could use a paintbrush like my youngest did here, or use posca pens. Posca pens are fantastic to have in your crafts supplies as they draw on pretty much anything, and give the most satisfying matt finish.
You’ve finished! I love to create a display of all the family’s pumpkins together with any other seasonal makes we do. Here are a few of the things we’ll be making this season.

Masks! These bat masks are quick and easy and the perfect accessory for trick or treating. .

Yarn ghosts, so simple and the perfect ghoulish embellishment to treat bags, banisters or spookily displayed on a mantelpiece. Even the youngest of children could make these with a little help, great for counting and scissor skills too. Here are the steps:

Step 1
Wrap some white yarn around a small book - the length of the book will be the size of the ghost. To make these ghosts, I wrapped the yarn around the book 50 times, the more you wrap it the bulkier the ghoul will be!
Step 2
Slide a length of yarn under the yarn bundle and tie in a double knot. Slip the yarn off of the book.
Step 3
Cut the loop in half with scissors, don’t worry if it isn’t straight, it will just give your ghost more character!
Step 4
Tie a piece of yarn around the top part of the tassels to make the head.
Step 5
Peel the backing off the googly eyes and stick to the head, then you have your finished yarn ghoul - make as many as you wish and add a little scariness to the brightest of corners! I made mine into a garland here by tying them to a length of yarn.
Did you know that the collective word for a group of ghosts is a fright?!

Possibly the quickest ever seasonal make, here is the satsuma pumpkin. I love how much these would cheer up the fruit bowl and what a spooky treat for a lunchbox. Simply take a sharpie and then add a pumpkin face to the tangerines! So much fun!

The skeleton keyrings are such a lovely treat, ours have been added to book bags, jeans and pinned onto memo boards, everything needed is included in the pack and is a wonderful eco friendly gift.

Disney’s film Coco is a firm favourite in our house so the Day Of The Dead masks are always on the go! To compliment the Mexicana theme, we have made simple paper picado which we displayed above our Halloween table. Essentially paper snowflakes, here's how they’re made:


I used A5 coloured paper, twine, double sided tape and some scissors. You can make the garland to any length you like, just add more flags - its the perfect quick decoration for a party!
Step 1
Fold the paper in half lengthwise and then in half again.
Step 2
Cut shapes along the long side of the paper and then the opposite side.
Step 3
Open out the paper (to gasps of delight!) and flatten out.
Step 4
Cut pieces of double sided tape and stick to the top of the flag.
Step 5
Peel off the backing from the tape, and lay on the length of twine.. Fold the top part of the paper down to sandwich in the twine and then repeat with the other flags.

I hope you’ve enjoyed our quick seasonal makes, please let us know if you make any of them!